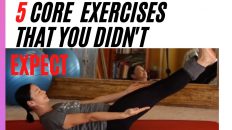
The best core exercises you can do for a bad back include anti-rotational core exercises (you can read more about why these are important here ) and glute training. These are critical to building strength in the muscles around your spine and hips so your bones are protected. Strength is a neuromuscular skill, so what we’re doing here is firing the right muscles to know what they feel like so we can then target and challenge them systematically.
(For core exercises you can do right at your desk click here)
1. Supine Thigh Press:
These core exercises connects the front and back of your core together. Come onto your back and bring your legs up to 90 degrees. Make sure your rib cage is glued to the floor. Place your hands on the tops of your thighs on the inhalation, exhale drive your thighs into your hands and your hands into your thighs. Breathe long slow and deep for about 10 seconds then release and repeat 2-3 times.
We’re now going to recreate this feeling but challenge the core more by moving the arms and legs away from each other. This requires more strength.
2. Deadbug With Isometric Press:
These core exercises not only trains anti-rotation but also scapular stability. Come to a place where you can press your hands against a stable surface with straight arms. You can press against a wall, a piece of furniture or even something where your hands come together as long as it won’t move. Bring your legs up to 90 degrees, making sure your knees are over your hips. Making sure your entire back is glued to the floor, engage your feet by pushing out through the heels and pointing and spreading your toes.
Inhale push the wall away and lock out your arms, feeling your shoulder blades engaging.
Exhale tap one heel LIGHTLY onto the floor, making sure the other leg is not moving. Inhale push away with the hands, exhale tap the other heel down. Repeat 5-8 times on each side.
Take your time and do these as slowly and controlled as possible for best results.
As you get stronger you can begin to straighten your legs and push away more with your arms.
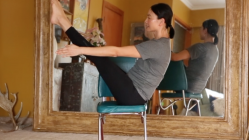
3. L-sits:
This core exercise rates pretty highly on the ‘God these suck’ scale but I promise you, the pay-off of a super-strong TVA, hip flexors and a strong and pain-free back is worth it. If you’re not a manual labourer or you don’t do a lot of hard pulling or suitcase carries, your forearms will probably be weak and by extension your wrists.
It’s best to get started with a little wrist warm-up. Bring your hands so the heels of your hands are facing you and straighten your arms as much as you can while bringing your hips back to your heels.
Breathe long, slow and deep.
Place your hands shoulder-distance apart on the floor and turn them out slightly. Gently rotate your body above your wrists, breathing slow and deep. Rotate for a few times in one direction then the other.
Now it’s time to move into the L-sits!
Sit with your legs in front of you between 2 blocks or heavy books. The higher the blocks, the more pressing power you will have which will be helpful if you are new to these. Place the hands on the blocks, making sure your middle finger is pointing straight ahead. DO NOT rotate the hands out or in and spread your fingers. Inhale, roll the shoulders away, exhale push the hips up and pull them back as much as you can. Keep the heels on the ground and breathe. Engage your feet and squeeze your quads. If you’re new to these, start with about 10 seconds and build up to 30-45 seconds.
Repeat 5 times.
To make these more challenging as you get stronger, you can lower the block height, use light ankle weights or put a weight in your lap.
Glutes
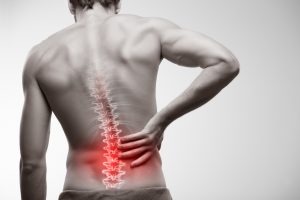
Having strong glutes is super important for a healthy lower back as they help to support and protect the lumbar spine from excessive movement. Nowadays, working the glutes has become very popular thanks to trainers like Bret Contreras (the Glute Guy) and Louie Simmons of Westside Barbell claims he healed his lower back working his glutes using a Reverse Hyper machine. I’ll show you a modified version of this you can do at home.
But first we’ll look briefly at Glute Anatomy:
The Glutes are made up of 3 muscles – the Gluteus Maximus (which is your butt cheek, the largest muscle of your bottom, the Glute Medius (which lies underneath the top of the glute maximus) and the Glute Minimus (which lies in front of Glute Medius).
4. Glute Bridges
This first exercise targets the Glute Maximus. By using a block, you’ll be able to target this muscle most effectively. Bring your feet towards your buttocks and place a block between your thighs and squeeze. Make fists with your hands and drive the elbows close into your body (this helps to engage your glutes). Inhale, then exhale lift your hips up and squeeze at the top of the movement. Inhale down then exhale back up again in a steady rhythm.
Sometimes it’s helpful to lift your toes and drive your heels into the ground as you bridge to contract the glutes more.
Do 3 x 10-15 reps.
To make these more challenging, you change up the tempo like slow down the eccentric part of the movement (when you lower your butt back to the ground).
5. Banded Clamshells
These exercises target the Glute Medius and Minimus. It’s helpful to have a band as the tension will help you to feel these muscles more. Take a mini band and place it around your thighs. Lie on one side on your elbow and bring the legs to 90 degrees. Inhale then exhale lift up the top leg like a butterfly wing. Squeeze the glutes strong then bring the top knee back and repeat 10 times. Change sides. Do 3 x 10-12 reps.
To make these more challenging, you can use a stronger band (or layer bands), and you can come onto the forearm so you need to use your core more to stabilize.
6. Banded Frog Kicks.
This is a great exercise to do for lower back pain as it helps to traction out your back while strengthening it.
Take a mini band and place it around your thighs. Next, lay your torso over a chair. You can use your kitchen table or if you’re lucky enough to have access to a reverse hyper machine, use that.
Make sure your hipbones are at the very edge of the chair so you can feel your legs dropping off the edge, hold onto the chair legs (or the table edge) and kick your legs out similar to a frog kick on the exhalation. Push out through your heels and squeeze your glutes. Bring them back in towards you on the inhalation, then exhale kick out again.
Do 3 x 20 sets of kicks
To make these more challenging, you can put a light mini band around your shins or above your ankles.
The great thing about all these exercises is that you don’t need expensive equipment, you can do these pretty much anywhere and you can make these more challenging as you get stronger. Ways to do that include adding more resistance if you’re using bands, varying the tempo (such as slowing down the eccentric (or lowering part) of an exercise or doing an extra half rep so you’re doing slightly more volume.
Practice this simple sequence starting from where you are for 60 days and you’ll notice a huge improvement in your back pain levels and overall strength.